Friday, October 31, 2014

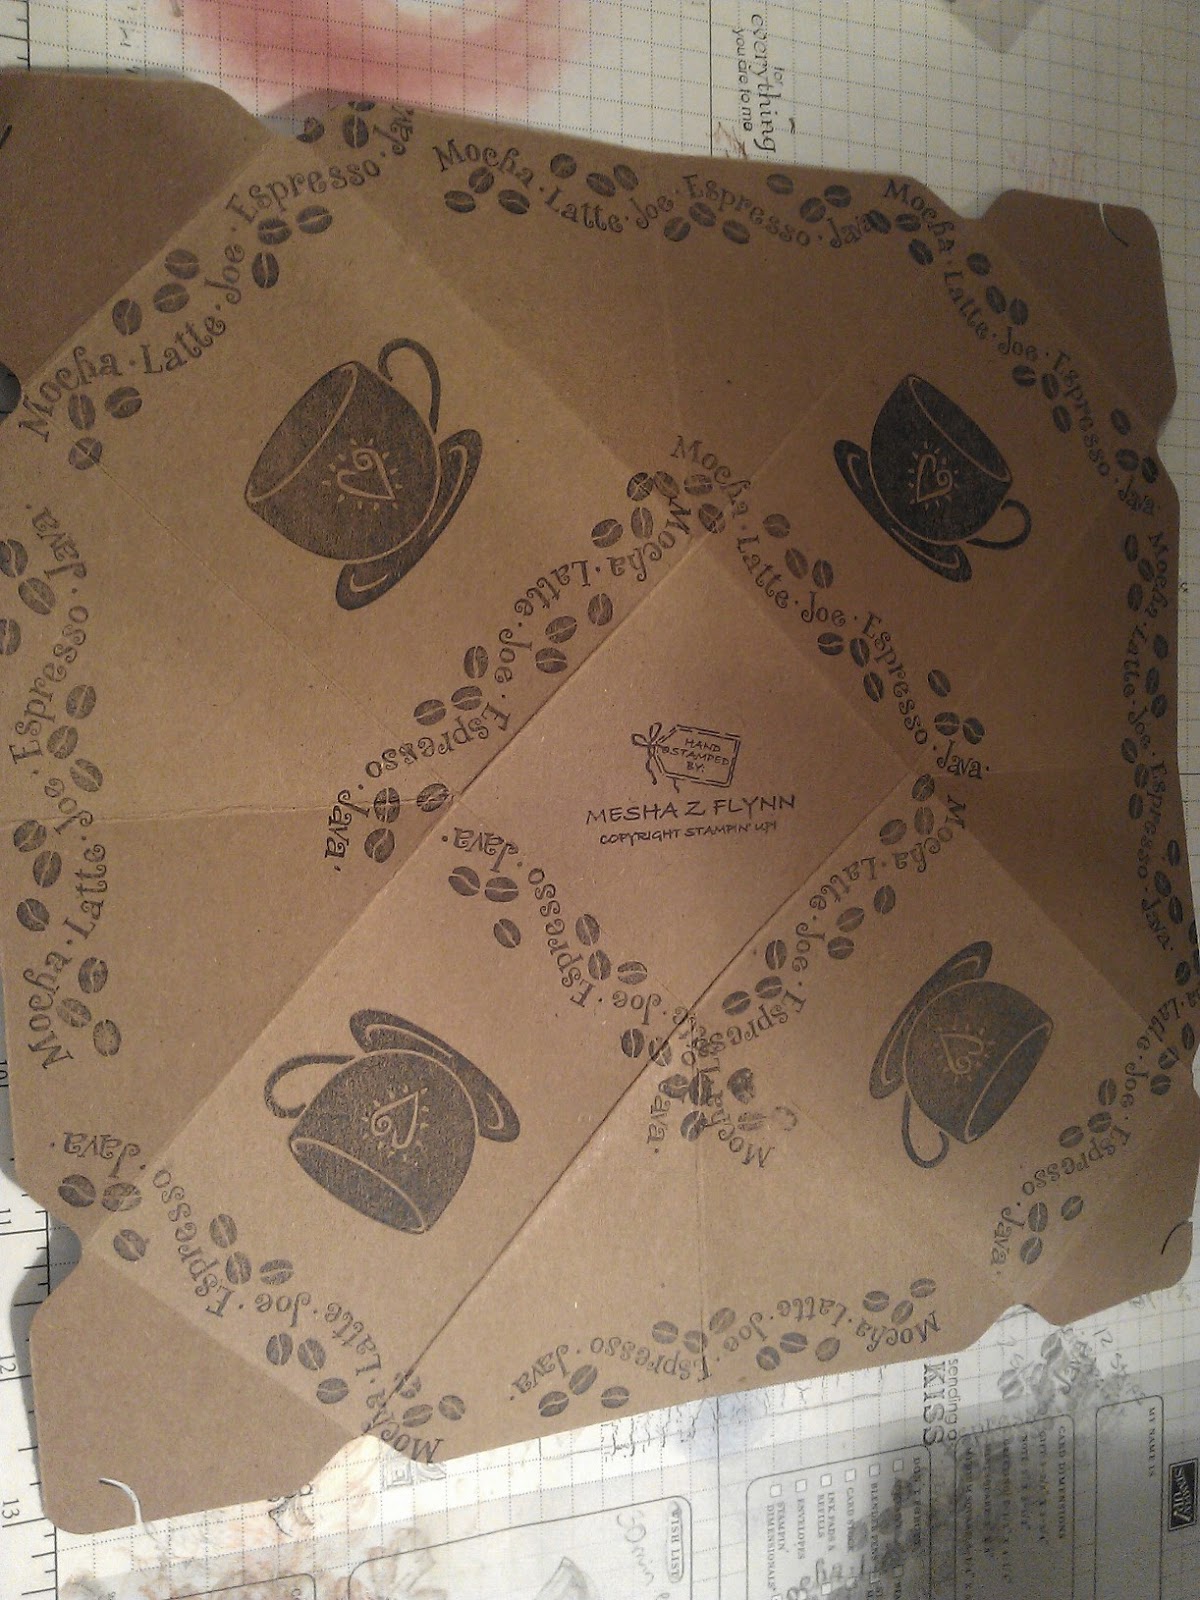
Espresso My Thanks Treat Box

This little bit of understated cuteness was made as a thank you for a sweet lady that allowed my OddBallKid's BFF to come over and sit up ALL NIGHT (on a school night) in preparation for my OddBallKid's medical tests the next day.  (Sleep depravation was required for the test.)  She and her Dear Daughter played games and laughed with us until tears rolled down our cheeks. 

I started with Craft Card Stock and the Gift Box Punch Board from SU.  You can see which box size I chose here.

This is what it looked like after following the instructions on the board and using a bone folder to crease all of the score lines really well.  I wanted her to be able to store the box flat for reuse later so no adhesives were used on the flaps of the box.

I stamped a sentiment on the bottom of what the inside of the box would be.  The set is called What's Brewin' from SU.  It is a retired set but one I use often.

Then I flipped the card stock over and stamped along the bottom of what would be the outside of the box.  Keeping in mind where the flaps will fold in allowed me to stagger the image a bit so it wasn't exactly the same on all sides.  

Then I did the same thing around the top.  It was then that I spotted a mistake (which is what happens when you craft at 2am).  Can you find it?  I would have started over or found a way to cover it, but she's always telling me things don't have to be perfect. =P

Then I added the cup image from the set.  At this point I really resisted the urge to add glitter.  I didn't want to wait for it to dry. 

The box was made to hold this but I threw some chocolates in with it.  I know how much she likes the mocha.  She's a Mocha Momma, but if pumpkin spice is available she'll take that too.

It's perfectly cute without the bow.  But this is me and I can't leave things alone.  Every time I start a project I have to argue myself out of more steps.  I'm still thinking about the glitter.

Here it is again with the bow.  Now the bow will act as a "belly band" incase the tabs on the top don't hold up.  She doesn't have to untie it, just slide it off and store it with the box for future use.  (Glitter on the cup?) (Ugh! Should've added swirls, but she likes her coffee cold, so?) 

Please comment.  Let me know what you think or if you have any questions.

BE A BLESSING & BE BLESSED

Teenage Mutant Ninja Turtle Inspired Birthday Card

A while back a friend asked me to make a TMNT inspired card for her nephew's 4th birthday.  Um... a bit out of my league but here it is.

Once I mapped the steps out in my head I made a little card so my 15 second memory would be able to repeat this if it's ever asked for again.

 
I punched the circle and the ovals then sponged the edges with a slightly darker green.  The smile is drawn on with a black felt tipped pen.  Then I adhered the oval onto the circle, playing around a bit to see what positioning I liked.

The I used the Word Window punch to cut the mask out but then ended up using scissors to shape it.


The tail of the mask is just cut with scissors free-hand.  There were several attempts to get a shape I liked.  I will suggest leaving a bit of a long part so you have something to add adhesive to when you glue it on the back of the circle.


Then I added the smaller circles. Once again I played around with the positioning until I was pleased.  I went back later and colored the yellow on the practice piece red because I know how particular Fandoms get.


Here you can see that I embossed a layer of black card stock with a bubble pattern but I used the de-bossed side to face up.  I used some gold glitter paper and red to layer circles.  The "4" took some thinking because I couldn't draw the four on the glitter.  I flipped the paper over and let the Dyslexia take over for a moment.  After drawing it backwards I cut it out with scissors. 


The base of the card is red card stock, then the black embossed layer, topped with all of the pieces adhered with Dimensionals (foam dots).  So, there ya have it!  "Totally wicked Dude!"  or  "Cowabunga!"  Let me know if you have any questions.
 
BE A BLESSING & BE BLESSED!

Thursday, October 30, 2014

Fall Gift Box

Here's some fall gift boxes made using the Gift Box Punch Board from Stampin' Up!  I tried to design something that could be reused once the recipient enjoyed their gift. 


I gave this one to another crazy cat lady.  In it were 4 little toy mice.
 
 
Once I decided on the dimensions I wanted and punched and scored the Groovy Guava cardstock this is how I decorated it:


I stamped a greeting in the middle of the inside.  The set is called Country Blessings that Stampin' Up! sold in 2006.  I stored this one flat until I was ready to use it, so no adhesives were used.


Then I began stamping on the outside.  I chose a random leaf pattern keeping in mind the direction the box would sit once assembled.


While stamping I used different colors of ink.  I started with the lightest, inking the whole image.  Then I inked the edges with the darker color. 


They come together like this.  At this point you could clip and adhere the inside flaps but I chose to leave them.  My bone folder got a good workout.


I chose a scrap of Close to Coco cardstock long enough to wrap around the box for a "belly band."  I really didn't think to measure because I just wrapped it around and then scored the folded areas.  The acorn is from the same set as the leaves and is stamped in the Early Espresso Ink. 


Okay it was an afterthought.  I'm terrible at remembering to measure things. But you get the idea of the thought process (or lack of).


Here's the leaf colors used on the whole box.  Here I used a strip left from making the box to make an embellishment for the top.  It's one leaf stamped twice.  Then I covered it with glitter glue.  This made the color of the cardstock slightly darker, much like Versamark ink does.  Then I cut them out together with scissors.  The glue on them made them stiff but pliable, allowing me to shape them.  This made the glitter really sparkle! *shiny*


In the set is a tiny stamp that says "Blessings."  I stamped that with the Early Espresso.  Then I used these three punches.  These get used so much I rarely put them away.  I used a paper piercing tool on the scalloped edge of the base oval.  That was adhered to the "belly band" with Dimensionals (foam dots).  Then glue dots were used to adhere the twine bow and leaves. 


The photo does not give the glittered leaves justice.  This one was just right to put a fall scented votive candle it for a sweet friend. Ironically, when I gave it to her she had a cold and couldn't smell the pumpkin spice. =(

Let me know if you have any questions. 

 Be a blessing & Be blessed!

Wednesday, October 15, 2014

♥ Carol's Christmas Cards ♥


♥ Carol's Christmas Cards ♥

She handed me a box of papers she found while cleaning out her mother-in-law's estate asking me to put them to good use.  So, I did.  Then handed these back to her.
 
I'll note supplies used when I can remember what was used.  Be sure to leave a comment if you have any questions about anything. 


I used the Big Shot to cut the layers out with the Famelits Labels Collection from Sizzex. The edges are sponged with Soft Suede ink. Studio G glitter glue was added to the pine cone. *Shiny* 
The ink bled just enough to enhance the image.  I used a Stamp-A-Ma-Jig to line the words up.  Again the edges are sponged with the Suede ink.  The "noel" tag is handwritten and hand cut.

The paper is from Paper Pizazz. I'm not sure what brand the cardstock is.  The pine cone set is one a friend gave me and it has no maker labeled on it.  The wording is from a Stampin' Up! set.  I can't remember where the cord came from.


Again the patterned paper is from Paper Pizazz.  A Big Shot was used to cut the ovals out using the Framelits Ovals collection from Sizzex.  I cut the ovals out of the patterned paper and the white, but the olive is an oval ring.  This makes the card look layered but it's really flat.  This means no extra postage!  =)


I used gold and red glitter glue on these. *Shiny*


The images are all from Stampin' Up!  Greetings Galore for the tree, Delightful Decorations for the "shine" of the star, Ornamassortment for the ornament on the inside, and Many Merry Messages for the wording.             


All of the images from these are from Merry Crittermas set from Stampin' Up!  They're stamped in black StazOn ink and then colored in with Prisim water color pencils and an Aqua-painter


 On this one a Martha Stewart snowflake border punch was used.  Some of the punched out snowflakes were flipped over exposing the blank side and adhered to the front as an accent.  Copy paper was used to line the punched out portion.
 
 
Here's a variation where I wanted to see what the patterned paper would look like embossed. I didn't think it was acceptable so I turned it over and used the blank side.


On this variation the edges of the base (green) were sponged with Whisper White ink.  The tag was made using the Small Tag Punch from Stampin' Up! and the wording comes from the Merry Minis set also from SU.  The edge of the tag is and the word are embossed with white embossing powder.


On this variation a light brown card stock was used and the same embossing folder as before.  The green baker's twine came from the dollar section at out local craft store.  The snowflake embellishment is just another one from the punched borders. 


This is how you solve the issue of the twine rolling off the desk.
One of my supervisors
 stopping by to check the work.


Creativity is a messy process.
Just keeping it real for ya!


THESE ARE ALL ORGINAL IDEAS.  Feel free to copy and share, but please give proper credit.  Also, feel free to share any you've made using these as inspiration. 

MERRY CHIRSTMAS!

Sunday, October 12, 2014

Altered Notepads 10-5

USE UP ALL THE SCRAPS!....   That's the mission lately.  These are some more altered notepads that are comprised of nothing but scraps.  My Oddball Kid loves the mixed media feel of them even though they're really not mixed media.


If your scrap pile is growing maybe it's time to try some altered notepads of your own.  I would love to see what you come up with.  I hope you were inspired.

Be a blessing and be blessed!


Pumpkin Goodie Bags

I was asked to make some more goodie bags so I went with a pumpkin theme.


 First I colored on the stamp itself with the markers and then stamped the image.  After that I used the water color pencils to color in the pumpkins.  After that I punched the images out with a circle punch and sponged the edges with olive colored ink.


Second I cut pieces of Dusty Durango cardstock and used these little embossing folders on them.  No I did not really measure anything, I'm really bad about just "eyeballing" stuff.  Then I  rounded the corners and sponged the outer edge of the cardstock with the Soft Suede followed by adding the Old Olive in a little further.  Also, the Old Olive was used on the embossed image.


Third the image was stamped all over the lunch sack.  No pattern, just random stamping.  Stamping off the edge adds to the project.  Easy stuff here crafters!


Fourth the top was added.  This picture is before all the goodies were added to the inside.  I wasn't too worried about these being reused so I just stapled them shut.  However, it would be super cute to use some twine or raffia to close it up.


These are so easy to make and change up for any occasion. Feel free to offer suggestions or ask questions.  I hope you've been inspired!

Thursday, October 9, 2014

Altered Note Pads

I have embarked on a mission.  Use up ALL of the scraps.  These little note pads were a good start.  I know the workspace is a disaster but hey, creativity is messy!


1.  I found these at the Dollar General for a dollar each.  I used a scrap of white cardstock to figure out the measurements.  They're marked in the picture. 


2.  I used these leftovers, as well as many others, of projects from long ago.  Yes this is where I got the ideas for the Apple Bags topper.  I know the cherries are from the Tart and Tangy set from Stampin' Up! but I don't remember the name of the set the coffee cup comes from.  I borrowed it for some invitations I made more that 5 years ago. Yep, I'm a hoarder.


Hmmm...  Which layout should I go with?.....

Seriously, some of this stuff has been sitting in drawers for years.  This paper is what is left from an aquarium background.  But that's another post.

I think I colored this with the brush tip markers.


3.  On this one I used the Scallop Boarder punch from Stampin' Up!  The little word is leftover from a scrapbooking kit.  I don't even know the name anymore.

These were way too easy not to make more!